
Photos provided by Paul
I first read about the Dragons teeth high route in Shaun’s book Classic Tramping, The Dragons Teeth Shaped from Ancient Stone. With a name like that, it sparked my curiosity. I added it to my list of must-do adventures. Over the next few years, I read more trip reports in Wilderness and the Great Unknown, one of a helicopter rescue on the Wireless section of the high route.
Leading up to our first planned trip two years ago we dug deep into the interweb and found some info on the high route we wanted to traverse.
We found the lovely Sage to help us with transport. Now we just needed a weather window.
Window no 1, two years ago, rain and wind, yuck, we went for an adventure in the Ruahine range instead.
Window no 2, one year ago, heaps of rain, yuck, we went pack rafting on the Mohaka 🙂Window no 3, three months ago, heaps of rain, yuck, we watched Youtube 🙁Window no 4, two good days followed by 12 hours of heavy rain and then clearing
We were finally going to traverse the Dragons teeth! An early flight to Nelson, rental car to Takaka, pick up Sage and head to James Rd in the Aorere Valley. We headed into the hills with packs full of food, a tent and a pack hauling rope just in case. We planned to get to Adelaide Tarn which meant a long day.
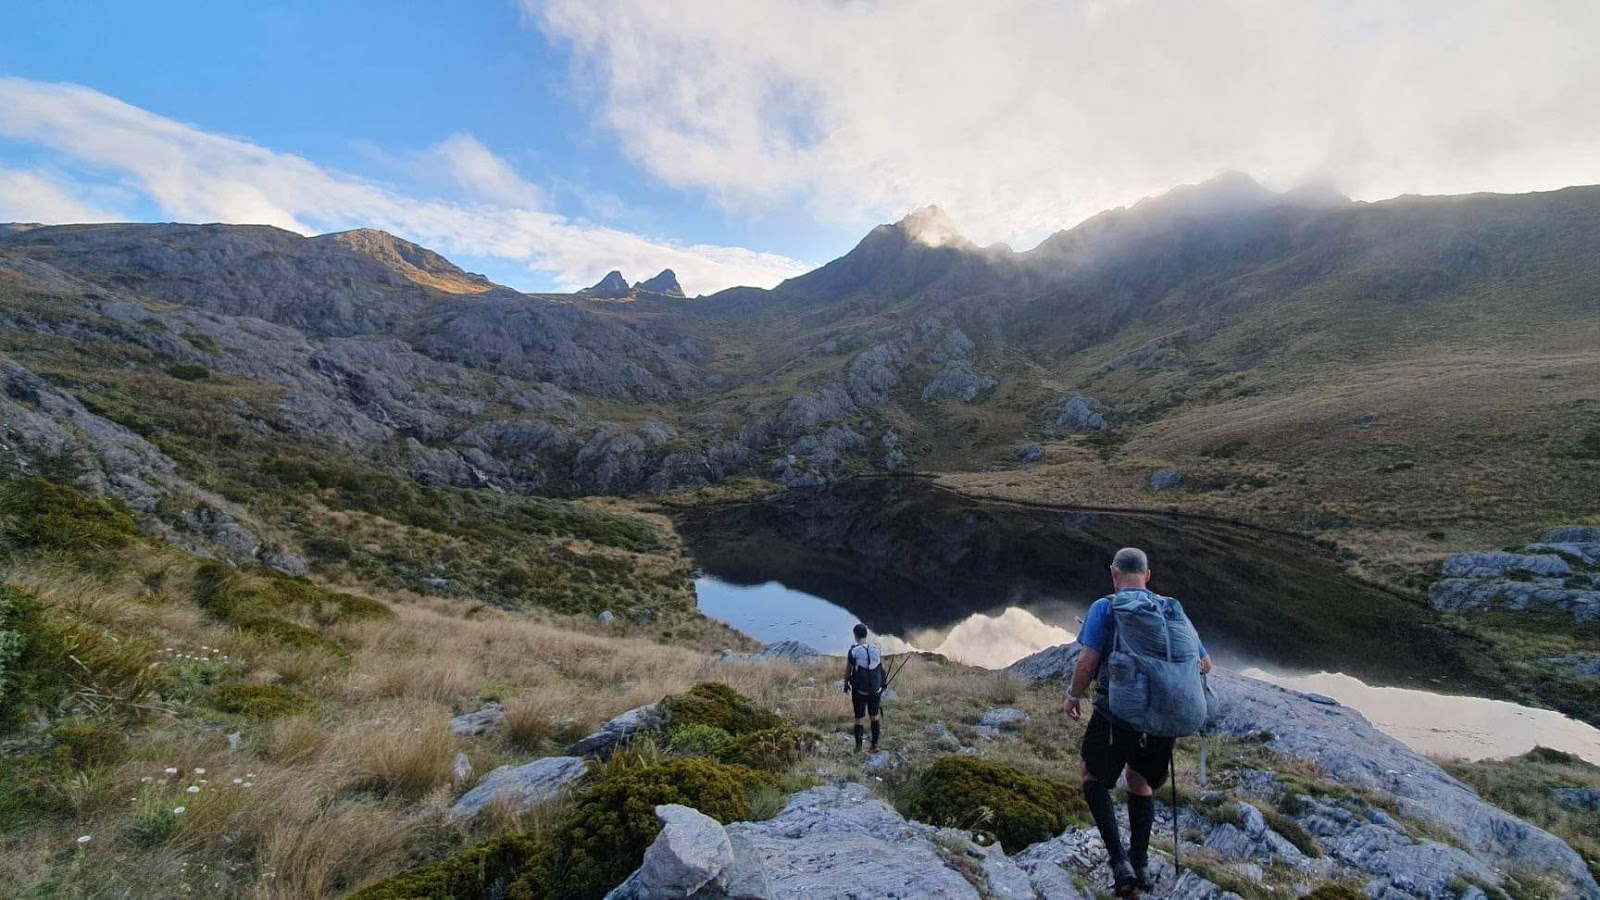
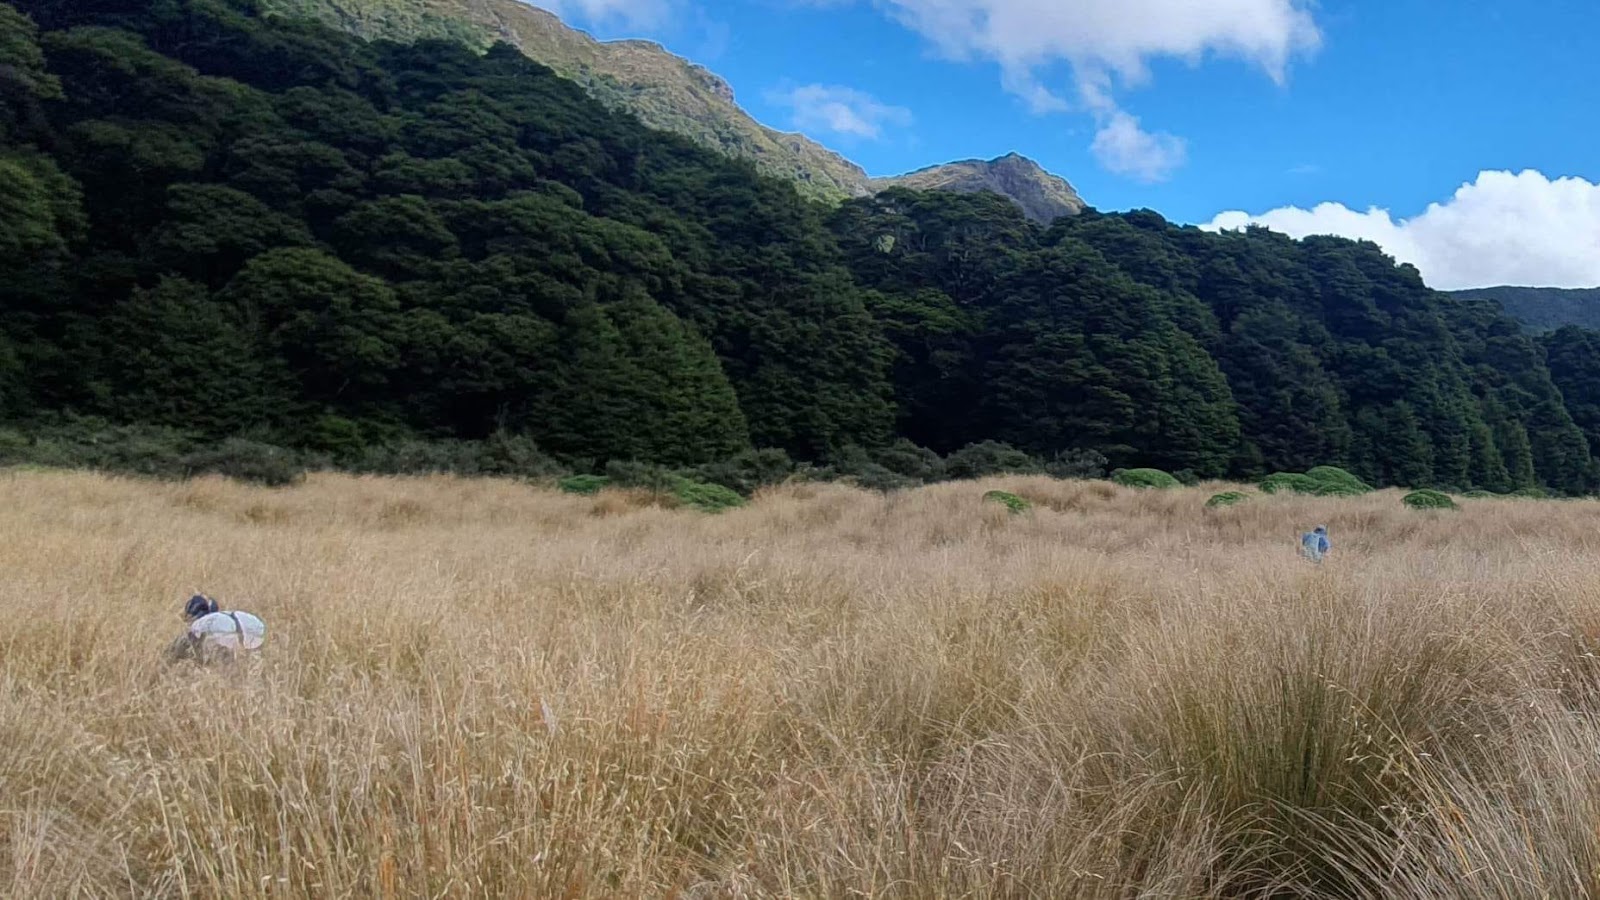
It was a beautiful day perfect for swimming. A quick dip in Boulder Lake was just what I needed to freshen up for the fun section to Adelaide Tarn. We waded through the head-high tussock from Boulder Lake Hut to the bottom of the spur to Green Saddle. Reaching the top of the saddle the ranges open up, it’s an amazing sight.

For the next few days, we would be trying to follow the route that included the high route across the Douglas Range to Kakapo Peak and then across the Lockett Range to the Cobb Dam.
The route to Adelaide Tarn was magic, winding across the tops, then sliding to the Needles Eye. We dropped from the cloud to the beautiful Tarn complete with a waterfall/shower and water hole/bath. We freshened up and feasted on the view over dinner.

The hut is very small, Marta and Paul squeezed into the short narrow bunks and I spread out in the tent. We reread all our route notes for the next day and went to bed excited for tomorrow’s adventure.
The sky was clear and no wind, these are the best days in the mountains. Marta had us up and ready to go early, we climbed to the saddle to get our first real view of the Dragons teeth. It’s a pretty crazy-looking bit of country. We had our notes out and entered the matrix of a route created by Keith Marshall in the 60s and more recently updated by the Red Man.

The route is like solving a puzzle, there are some cairns, a few can lids, tied flax and some little red markers. These combined with the riddle on the route information there were lots of re-reading and regular celebrations when we found the next clue. We lost the route following a drainage path and had a retrace until we found a tiny pink bit of tape above us.
Marta found the roll of wire and we had our next riddle to solve, the famous wireless was up above us but a clear footpad was traversing around this. We scouted the footpad and turned around when we couldn’t find any markers. Back at the wire, Marta and Paul searched for any sign on the steep slope above. I checked the map on my watch and to my surprise, there was a route showing, and we were on it. This showed the route following the footpad, we headed back in that direction and found some red markers not long after where we had turned around. Now we were into a steep scramble up the base of the first tooth of the Dragon. There were a few exposed bits but the holds were good and quickly we were over the tooth and into the mouth.

We ate our croissants looking at the Chimneys below Anatoki Peak a nice spot on a sunny day. We picked up the cairns and markers that took us down and sliding across below the bluffs and weaved us up an exposed but workable route. There was a bit of bush bashing in this section that ripped my pack pockets, our legs and arms. As I scrambled over one of the ledges I found a walking pole that had been ripped from someone’s pack, normally I came back from trips one or two poles down this time I had a pole win. We popped out onto Anatoki spur and celebrated completing the high traverse. It had taken about 5 hours to cover 5kms, a very cool bit of backcountry travel.
We walked up the spur past the tarns that would make great camping spots and followed the cairns that sidle across the range to the Drunken Sailors. It was hot, we used the tarns and water holes to soak our hats as we enjoyed the view. In a few more hours we dropped down to Lonely Lake and found the beautifully restored hut gleaming in a beautiful spot overlooking another piece of the range. I cooled off in the lake, what a spot. The hut has a perfectly positioned picnic table to enjoy the sunny afternoon eating, drinking and chatting about our adventure. Magic 🙂

This was where our weather was due to change, we decided to head to Fenella Hut to weather the 20mm of rain that was due to arrive in the afternoon, we had a wet morning in the clag getting to the hut and arrived to a fire and the luxury of a big serviced hut with one other tramper. Paul worked on the puzzle that had seen 12 hours of effort from another party, we ate, slept and read while it rained cats and dogs outside. It cleared in the early hours and hopefully would hold for our last day over the tops down the Lockett Range to Sylvester Hut.
After a quick visit to Fenella Huts’ local swimming Alpine lake (wow), we climbed back into the tops and followed the cairns along the ridge. This was another different and amazing section of this traverse, I can see why people love to camp on this section. The views and terrain are excellent, the wind blow and the cloud rolling in and out which added to the experience. 
We were treated to a magnificent sunrise over the Wharepapa Arthur Range to finish our adventure.

Good info on the route can be found at http://www.john.chapman.name/nz-dragon.html and some low route photos here https://tramping.net.nz/routes/dragons-teeth-route-kahurangi-national-park
These photos from https://www.highlux.co.nz/2013/05/dragons-teeth-high-traverse/ were a great help in understanding the route info

We followed a marked route to the left of the route shown below

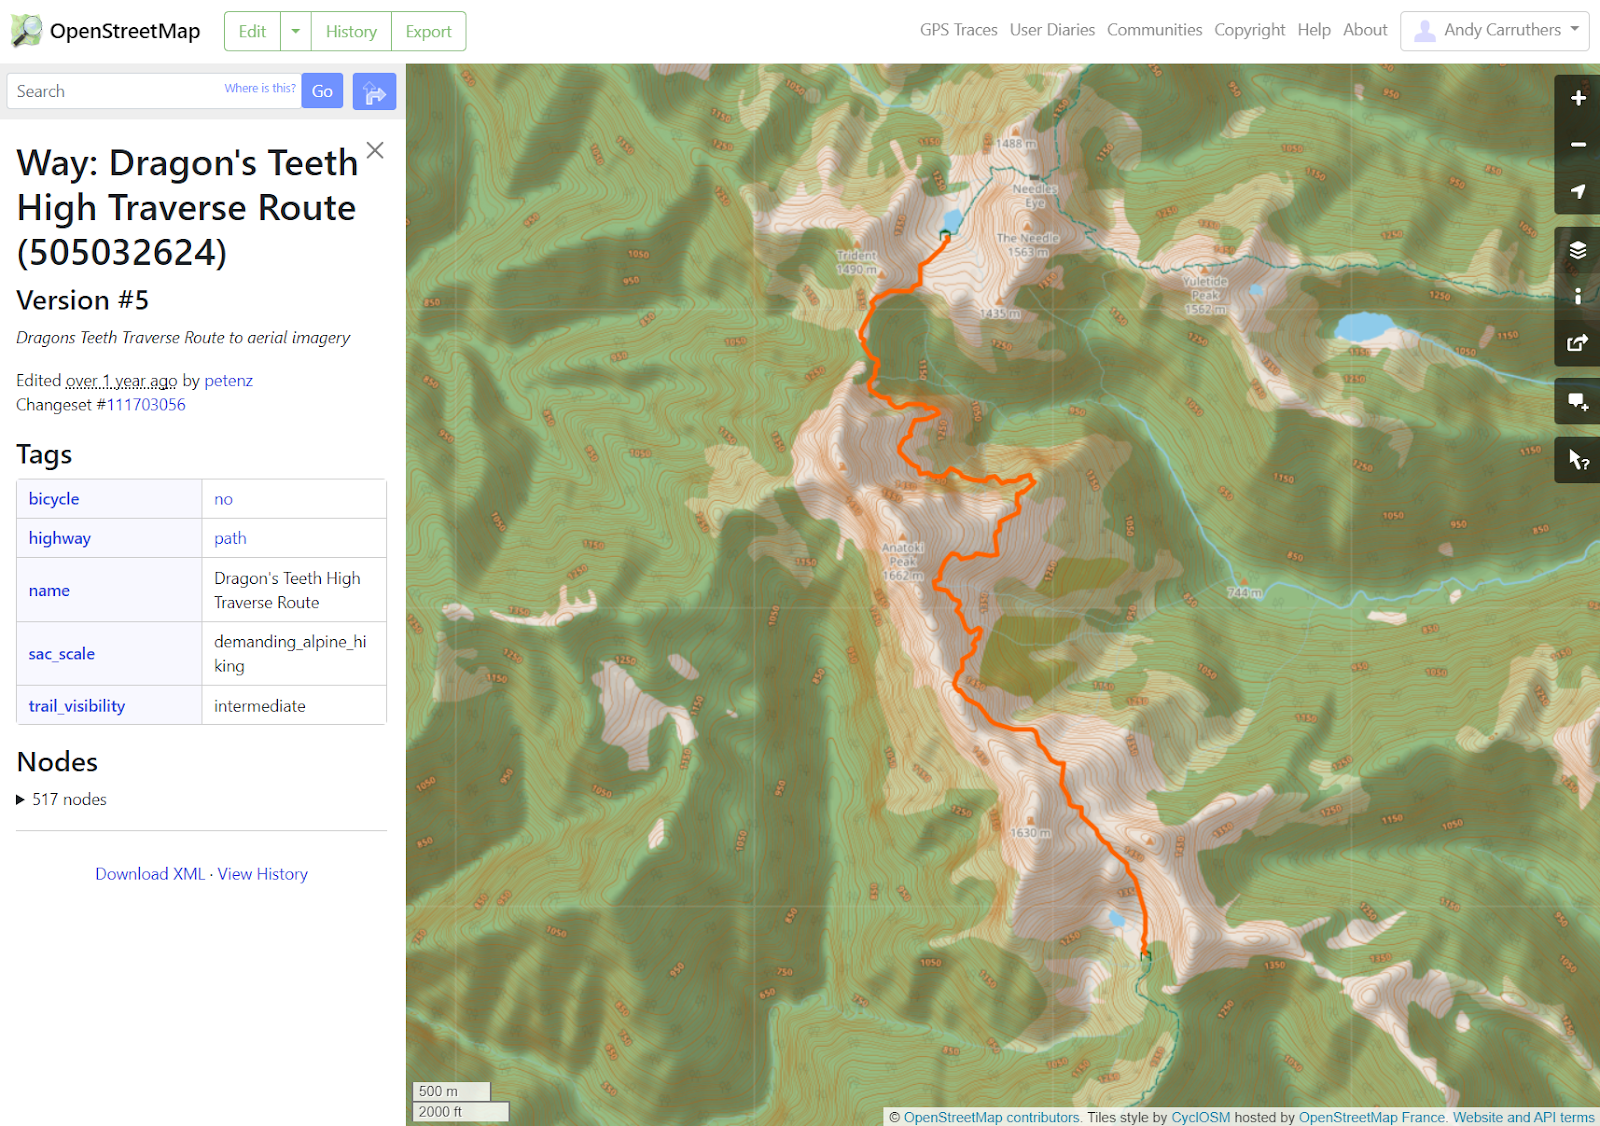
This is the route details that appear on the Garmin Mapping https://www.openstreetmap.org/way/505032624 this has a downloadable XML file
Our route

4 responses to “The Dragons Teeth High Route – Kahurangi”
[…] article originally appeared on Andy’s ‘Mountain Adventure Blog’ on 17 February 2023 and is reproduced here with […]
[…] thanks Andy Carruthers for his permission to reproduce this article, first published on his ‘Great Walk Adventures’ blog (13 May […]
Hi Andy , If the pole you found on the Dragons Teeth is a Komperdell carbon pole , black with blue trim, it’s mine ! A mate and I went through from Adelaide Tarn to Lonely lake on the 19th Jan this year, really interesting reading your trip report, we lost the route in the same place as you guys did. Great feeling walking down to Lonely Lake after traversing the Teeth, epic tramp.
Mike
Hi Michael,
It is a wonderful route.
Yes, it is your pole. What is your address to send it to?